Thursday, December 7, 2017

Jewels Underfoot VI: Hawai'i, Maui Wailea Beach


A co-worker must have brought this sample to me. I don't remember.

I now do the photography with a 100mm macro lens on a full-frame digital camera, with a diffuser to soften and spread the sunlight. The sand is on a white porcelain platter, placed close to the minimum focusing distance so the magnification is close to 1:1 on the sensor. In editing I adjust color balance and contrast moderately, so details show up better. I crop a roughly 4000-pixel-wide section from the original image, and scale that to 1584 X 1056 pixels for the blog. The final step is a modest unsharp mask.

Because I'm more interested in showing the beauty of the sand, the scale in these images varies a little, from about 3cm across to 3.5cm. I show multiple images of the sample because one isn't enough.

Hawai'i, Maui, Wailea Beach
Click on an image to see it full size.


Friday, December 1, 2017

17F-3 (December 1)

Dealing with Conditions

The free-piled sculpture of two days ago convinced me that any further sculpture done in this tide window needed to use a form and filter. I told Deb that, weather permitting, I'd be out on Friday. Thursday would have been good but I had to pick up my car after getting a replacement catalytic converter. They're easy to steal from 2008 Elements.
     Weather did permit. The morning came up calm and clear. I leaded the cart, ate lunch and headed out.
     The sand was as expected. I really should have motivated myself to finish the new screens, as I had to struggle with sand grains of the size that plugs up the Box Filter. Piling was slow. Sand has gotten heavier, I think, and water farther away.
     Four full loads will fill the form to the top, with a little left over. I picked up three full loads for this shorter day, and that was about right. By the time I was done... I was done in. It was a good pile.

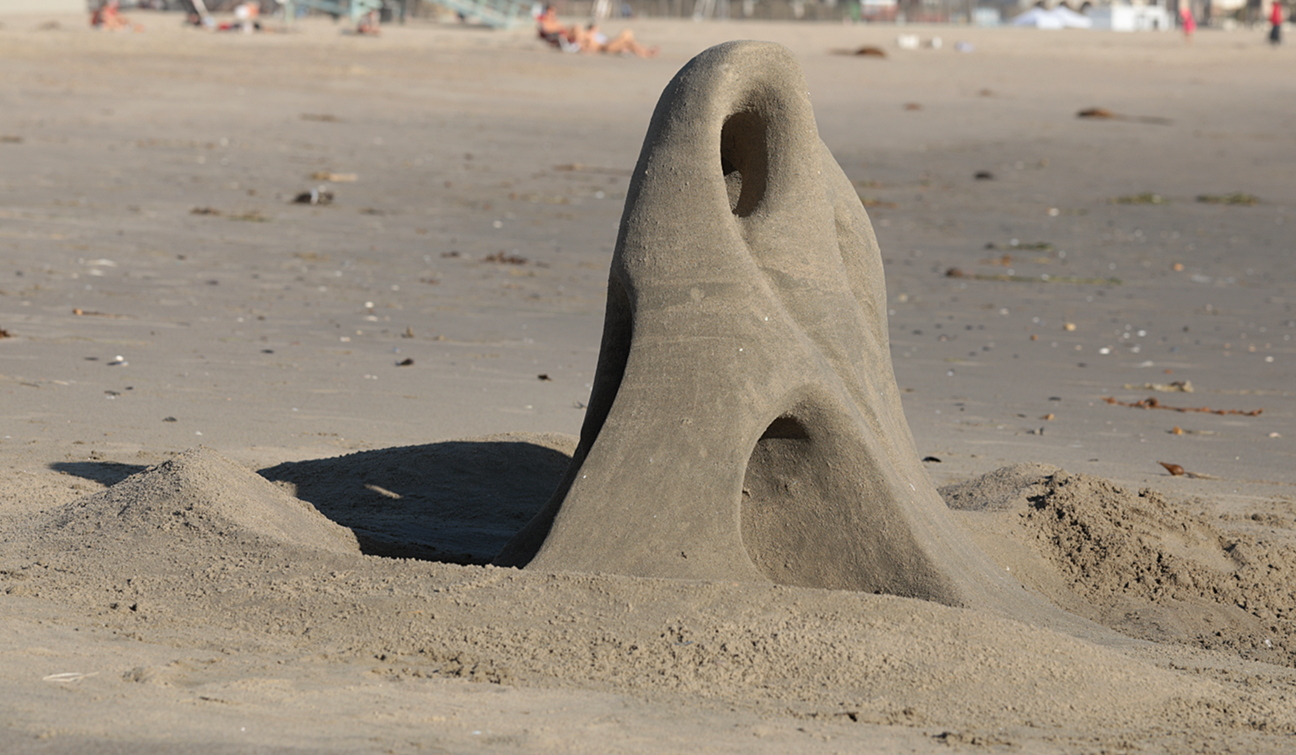
Build number: 17F-3 (lifetime start #345); monolith on low sokkel
Title: "Lines"
Date: December 1
Location: Venice Breakwater, isthmus south side
Start: 11:00, construction time approx. 4.25 hours
Size: about 33 inches tall, 21 inches diameter
Technique: Latchform, Box Filter 2, three full loads intertidal sand
Digital Images: 48, EOS-5D Mk IV and 100mm F/2.8L, tripod and handheld
Special photography: macro photos of sunlit sand in finished sculpture
New Tools: none
New Equipment: none

I hadn't given much thought to what to carve. Between struggling to care at all, and balancing my new Second Life responsibilities, scheduling a sculpture is hard enough. Planning it is even harder. Load the cart and go. So, now I have this pile and not much of an idea what to do with it.

Well, it is pretty on its own. Finally I get a vague idea for a big opening on the sunlit side that will come out the top. I carve a curving surface for the hole, and then change direction. The space goes to the bottom instead, with a broad curving piece over the top of a kind of Gothic arch. I can tunnel upward and come out the top.
    So, I start shaping the top. There's really no hurry, so I shave off thin layers, then remove the sand with a hand. The curve begins to look good, and suggests another idea. I continue shaving and shaping, and smoothing with a hand. The afternoon sun brings subtle shadow to the surface.
    I like that as it is. So, I'll put the opening somewhere else, like down below. Again, there's not need to be quick, so I carve slowly and leave enough sand for further shaping inside the space.
    The rest of the sculpture goes in like fashion. Time taken to consider and connect the various lines. A part on the north doesn't fit, so I cut it back and merge it with a space that connects to the center. I've done things like this before, but as Rich used to say, "If you can't make it new, make it better." I made it better this time, like it belongs.
    The whole sculpture shows a sense of balance that has been lacking in recent pieces. Nothing looks awkward, and there's no ugly side/pretty side conflict. It's massive, although short, with strong presence, yet has a kind of springy look from certain angles.
    It's certainly popular with passersby. One of them, Rita, a sculptor from Italy, takes the time to take many pictures. While I'm talking with her, Deb arrives.
    "Nice to see you, Deb!"
    "I'm glad i made it in time."
    "I didn't expect you to be here, after you mentioned needing to wait for the gas company."
    "That all went well."
    She wanders off to look around the beach, which is really lovely in the evening light. As the sun nears the horizon, the light softens and caresses sandy curves. Other people pause to look at the sculpture.
    I'm having trouble thinking. I hope some of the photos come out. My mind keeps skipping things, and the low-angle light makes it hard to see in the viewfinder. Exposure is mostly a guess.
    Two men from England stop and chat for a bit. I try to talk them into coming back and helping for the next sculpture, but they'll soon be returning.
    The sky glows, but the sun is gone from here. I gather enough wits to gather equipment and stow it in the cart. A last site check and walk around the sculpture, and then homeward bound in the falling light.
    I pass by a young couple who'd stopped to talk. Now they're taking a self-timer shot with an artwork on a board they'd bought on the Boardwalk. They invite me to join them for another photo. And then I make my way across the beach and north along the Boardwalk, avoiding the hills on the alley route... and the Friday traffic.
    A quick check of the images at home shows that ast least some of them are decent. Good. First time I've had a chance to photograph in sunset light with the new camera. Dinner, shower, bed. With a short pause to write a basic report.
   
Post-sculptural addendum:
Looking through the images in more detail, the mystery deepens. Exposures range from severely burned to nearly black, and many are also out of focus. Finding three images that will work for an image assembly is a problem... for one or another problem. Usually I don't have so much trouble.
    In the afternoon of the next day, when a more-or-less quorum of brain cells have struggled out of the post-sculptural fog to think about things, it becomes logical to see how the camera's metering is set. It has several modes. I find that I bumped the wrong button at tome point and sent it for a special metering mode that didn't work for my purposes. Learning curve. I knew something wasn't right on the beach but couldn't concentrate on figuring it out.
    I'm also changing the way I do things. Manual exposure can be consistent but wasn't for this sculpture, because of the mis-set meter mode. So, I switched to automatic exposure and used exposure bias to tune, which also didn't work, for the same reason.
    The focus issue... I don't know. I must have thought I was set for auto-focus. But that doesn't work well on the shaded part of the sculpture. What with sand on my glasses and sunlight in my face, I was having a hard time seeing anything at some angles.
    Best solution: Hire a photographer who can be a real photographer instead of an end-of-the-day sand sculptor. Second best: Set the camera to all automatic and shoot a round of contingency photos. I did that for the previous sculpture. In any case, remember to check the camera's settings before starting out, and after changing any settings.
    People adapt. Use a camera with a malfunctioning meter long enough and you'll get used to it, and make photos that are consistently well exposed. There will be a surprise when you pick up a new camera and, perhaps, try to figure out which one is "right." All meters are different. It has taken me some time to adapt to this one's interpretation of light and, just when I thought I understood how it worked, it changed. If I'd have been more alert at the time I'd have thought to check how it was set; given the overlap of controls it's easy to set one thing when intending to set something else.
    The final truth is that this sculpture didn't come out well, even in the better photos. This has happened before. Some sculptures translate to photographs better than others. They really want to be an object in space.
    My experiment of taking a macro photograph of sand in the sculpture didn't work out so well as I'd hoped. With the sun in my face, seeing the exposure meter was hard and I overexposed the images. The close working required having the camera's image plane parallel to the sculpture. My weary eyes caught some of this but not all. And then there's a more fundamental problem: like looking at a cloud as you approach it, the boundary becomes very fuzzy when close. Horizons that are obvious at normal distance become much harder to see up close. They can be seen, but they're not obvious. Even with the problems, though, the sand is pretty. Improved technique should help, too: self-timer and mirror lock-up to reduce camera shake that affects close shots.
   
   
Santa Monica
2017 December 1, 2

17F-3, "Lines"
Click on an image to enlarge


Here's a macro shot of the upper surface in the above photo, shot from about 7 inches away with the 100mm lens.


Nearly full moon, at perigee.


Jewels Underfoot V: Venice Beach low tide line

A geologist would call this material "poorly sorted." If you walk the Venice and Santa Monica beaches when the tide is low, you'll see this mix where the waves keep the sand agitated and mixed.

Low tide varies. When the moon and sun are about 90 degrees apart (first and third quarters), high tides are relatively low and low tides are relatively high. Each day is different from the next. As the new or full moons approach--sun and moon aligned--the lows become lower and the highs become higher.

The low tide zone is established by "mean lower low water." It's where there is always turbulence at about the same vertical level, and the low tides stay at this level for a few days. The result is that it's never calm, so nothing gets sorted into layers as you'll find higher on the beach if you dig a hole.

I used to try to photograph this sand and gravel mixture in situ. It is, however, always wet and loose. If I try handheld my feet settle under me with wave action. If I try to use a tripod, its legs sink. I like the in situ photos but getting them sharp is difficult. So, one day I picked up about four pounds of this, took it home and let it dry out.

These photographs were taken with the sand on a white platter. I used a diffuser to soften and spread the light from the sun in my front yard. The platter was on a level platform on a tripod, with the camera on another tripod pointing straight down and adjusted to be perpendicular to the platter in both axes.

The diffuser broadens the light source, making shadows softer and reducing specular highlights. Leveling the subject and camera means the sample is sharp in all areas. I choose an F/stop to get just enough depth of field without running into diffraction. I don't have to worry about shutter speed on the tripod. Post processing brings up the contrast a bit. These are all full frame, and are about 10cm across.

I simply took pictures of different areas of the sample after spreading it on the small platter. Endless beauty. To see more detail you can click on the images to make them full sized.


Jewels Underfoot IV: Hawai'i

People I used to work with knew I'm a sand sculptor and interested in sand. They'd bring me samples from places they travelled. I have kept the samples all these years, labelled with the location but with no notes about who did the collecting.

I have five samples from Hawai'i. They are astonishingly varied by location, and even within one sample. These photographs are intended to show the beauty of the sand rather than being quantitative, but the long dimension of each image is roughly the same at about 3 centimetres.

This sample is from Wai'pio, on the Big Island's northeast coast. Look closely at the variations. It's nearly all volcanic origin. Olivine and bits of lava. My early macro technique didn't work well for this sand; I was using direct sunlight, which led to intense specular highlights against the dark grains. The contrast was too great. I bought a diffuser to tame the highlights and got much better photographs.You can click on any of these to show them full size.


This is a work in progress. I've been looking around the Web at sand images, and thinking about what I like and what I don't like about them. One clear idea is that one image isn't enough, so I'm adding more of each sample.

I also realize that mine lack an indication of scale. My purpose is to show the beauty of the sand, but there may be ways to show scale that don't interfere with that. Here's one experiment. The image immediately below is at the "normal" size I use: a crop that's about 4000 pixels wide, scaled down to 1584 pixels.


The next image is a crop to actual pixels from the same photograph I used above. I've carefully set the subject at the minimum focus distance so the sand grains are as big as I can make them on the camera's sensor. Given that the focus distance will be the same for any image made this way, the grain size can be compared.

At this distance there's not much depth of field, and little tolerance for movement. I use mirror lock-up and the self-timer. I usually apply minimal sharpening, but for this one I experimented with two passes: one a relatively coarse setting to get the outlines, the second finer to get the detail of each grain.


This is an experiment. The sand shown below is from Ocean Park, photographed at the same scale (about 1:1 on the sensor) as the Wai'pio sand above. This photo shows the sand on a 1mm grid. The same scale applies to all of the other close images here. In short, the images show a scene about 8mm wide.


And here are two more images of the sample.


----------------------------------------------------
This is from Hidden Beach, on Maui. Easier to photograph because the sand is light colored, so not so much contrast with the specular highlights. Still, I'll reshoot this someday using the diffuser. Each grain polished. Kind of like desert sand, but even more smooth.


Below are three more images of the same sample. I cover the bottom of the white platter and move it around to get varied composition, and a better idea of what the sand is like. These benefit from better technique and equipment.


--------------------------------------------------------
This sample is from Hanuma Bay on the island of Oahu. It's an interesting mix of volcanic and coral and shells.

Because I was interested in the sand of Hawai'i, these were some of the first macro photos I took. My technique has improved since then. I took advantage of good light and photographed this sample again, using a better 100mm macro lens and a diffuser to soften and spread the light.

I put the sand on a white porcelain platter. That sits on top of a platform on a tripod so I can level it. The diffuser shades the platform. Sand covers the bottom of the platter and I move it around to get different compositions. Even within a sample there are variations, so I'm adding the three following images from Hanuma Bay to give a better idea of what this sand looks like.


------------------------------------------------------
This sample is from Ha'ena Beach Park on Kauai. 


I made more photographs of this sample, using the 100mm L macro and with a diffuser to soften the sunlight. The one immediately below is the usual 4000 pixels scaled to 1584. Below that is an actual pixels crop from the same photograph.


Two more images of the same sample, just because the sand varied and beautiful.


I've learned that sand varies by large-scale location, and also within any particular deposit. Any beach really needs to be sampled from many locations: high-tide, low-tide, under water, upper beach beyond normal high tide. I can do that for local beaches, but for places like Hawai'i I'll accept whatever I get.

Wednesday, November 29, 2017

17P-8 (November 29)

The tide window opened today. Low of 1 foot at 12:19. It would be even better the next day, so I decided to go take a look at the sand. Given how bad it was the last two times, I wanted to have some idea of what to expect.

I took nothing but keys. Walked over the hill and down to the beach, then south. Currents and waves, along with growing tides as the full moon approaches, have caused erosion of the beach south of Ocean Park. There's a four-foot-tall bank in places.

The day was calm and cool. Sunlight through high thin clouds. Water clear, surf moderate. At times there were scatters of pebbles, and I picked up a few and put them into pockets. I didn't expect any sculpture so wouldn't have to worry about sitting on them.

The south side of the isthmus had a top layer of fine sand, along with shells, sand dollars, fragments and pebbles. I dug some sample pits. The sand was finer than what I'd used for the last sculpture, but there were the usual rough items. Moving east made it worse so I tried farther west than I normally go. Here I found, under about 5 inches of decent sand with shells, a thick layer of fine clean sand.

I'm not dressed for it, not prepared for it, but there are some mussel shells for carving. Fine sand is a gift. Accept it while it's there.
   
Build number: 17P-8 (monolith with extension and earthworks)
Title: none
Date: November 29
Location: Venice Breakwater, south side littoral, closer to breakwater than usual
Start: 11:30, construction time approx. 2 hours
Size: about 24 inches tall, base roughly 22 inches across
Digital Images: none. No camera brought
New Tools: none
New Equipment: none

The sand I built with wasn't completely clean. As the borrow pit became wider the sides fell in, but I could dilute that sand with the better sand from underneath. I wasn't equipped for overburden removal.

The pile was good but variable. Layers made after some side wall fell in were rougher. Layers made from the fine sand were good.

Carving was done with mussel shells and hands for the deep spaces. The top part had a strong lean to the north which I trimmed a bit to balance. There were spaces underneath that, and a big hollow through the lower center.

I shaped earthworks to go with that. On the west I added a long ridge sloping up to the sculpture's end. On the east the earthworks were separate, and wrapped around, with my handprints on the south end.

It worked out well. Some nice details that fitted with each other. Shaped mostly by hand after rough carving with the shells. it was a much more fun piece to work on than 17P-7 with all those rocks.

I wish I'd had a camera. Not just for the sculpture, either, as the way the beach had eroded left beautiful patterns behind.

Santa Monica
2017 November 29

Monday, November 20, 2017

17P-7 (November 20)

The tide window was still open. I hoped for improvement in the sand but I had my choice of a higher place with coarser sand or a lower place with many tiny clams. I chose the higher site.

The coarse sand required very fast piling, so I could get the next layer on before the lower ones became too dry. That's why this piece is tall and narrow. The result was soft, with softer places and many shells, pebbles and fragments.

I was already mentally scattered, and had a hard time focusing on anything. Even the earthworks were mostly an afterthought, with little real design applied.

I'd thought about bringing a form so I could screen the sand. I should have. I'm tired of the rough material getting into the way, but as one observer said "That makes for good surface texture." True, but frustrating when one wants to carve details.

The sculpture is about 28 inches tall.

The lighting was strange. Thin high clouds that varied. I shot with cloudy white balance, which sometimes worked and other timed didn't. I probably would have been better off shooting with daylight balance and correcting later, as removing excess blue seems to be easier than correcting excess red.


Friday, November 10, 2017

Jewels Underfoot III: British Columbia

In 1995 I entered my first sand sculpture contest, and won it. On the strength of that I applied to the World Championships in Harrison Hot Springs, British Columbia, for 1996 and was accepted.

A friend of mine happened to be there and picked up a sample of the sand so I could find out in advance what I'd be working with. The news wasn't all that good.

Sand from Harrison Hot Springs, BC, collected by Bert Adams
Click on the image see it full size

Harrison Hot Springs is on the south shore of Harrison Lake. What is missing from the sand sample is the silt that is mixed with the sand on the beach. Ocean sand doesn't contain silt because of the wave action. Waves agitate and currents move the silt to calmer areas; the sand remains.

Silt mixed with sand is actually a good thing because it fills the gaps between sand grains and holds everything together. Think of the rammed earth of China's Great Wall that has stood for a thousand years.

The problem I ran into was that in filtering out the roots and other detritus, I separated the silt from the sand and ended up with a weaker pile. My first attempt fell over as soon as I removed the form. A more careful job the second time yielded a column of sand that I spent the next two days carving. It fell over after I sprayed the required preservative on it. There is one extant photograph of this piece.

96M-1, "Zen Sound"
World Championship at Harrison Hot Springs 1996
Photo by a friend of my sister's

That was the first multiple sculpture I ever made. The idea came from a boat ride a friend and I took back to Vancouver from the end point of the Royal Hudson train ride. It's a fjord, rockbound in curving granite. Note that I'm rather silt-colored. The shower at the end of the carving day was a real pleasure.


The other samples from British Columbia probably came from Earl, who also helped me at Harrison. It was a long time ago and I've forgotten the details.

Crescent Beach
somewhere in British Columbia
Click the image to see it larger


Tofino, northwest end of Vancouver Island
Clicking the image will bring up a larger version


Tuesday, November 7, 2017

Jewels Underfoot II: The Fingers Know

Many things happened after I took that first macrophotograph of Venice Beach coarse sand. One idea was to see if the camera could confirm what my fingers told me in the late 1980s.

My first formed sculpture in California was done on Santa Monica Beach, just north of the Pico-Kenter storm drain near lifeguard tower 18. The spot was easy to reach and had what I thought was decent sand.

As my sand perceptions became trained I started looking for sand that felt better. In 1987 I started doing sculptures in Venice because my fingers said the sand was better. There followed a hiatus for 7 years, but in 1994 I went back to Venice's Breakwater to sculpt.

Regular practice, even w hen it doesn't feel like practice, leads to learning. I noticed that the sand was different each time, which led to exploring the beach to find how the sand moved. Might there be even better sand somewhere?

I learned that, yes, there is better sand down close to the low-tide line. I could feel the fineness. Creamy, smooth, and it was also darker. It made such a difference in the sculptures that I started carrying it from the low-tide area to a spot above the coming high tide so I'd have the day to carve it.

I went on my merry way for years. I knew there were colors in the sand. It made layers in the piles I carved. The naked eye misses much detail at the scale of sand. The camera can see what I couldn't. Curiosity led me to make a series of photographs, with improved technique, of three samples of sand: Ocean Park typical mid-beach, Venice Beach high tide typical, and Venice Beach low tide.

Ocean Park mid-beach sand, collected in spring of 2017
North of Pico-Kenter storm drain, typical location used in 1984
Background grid is 1mm on center, image 15mm wide
Click on the image to see it full size


Venice Beach sand from the high tide area, collected spring 2017
Near Venice Breakwater, typical of that used in 1994 and '95
Background grid 1mm on center, image about 15mm wide
Click on the image to see it full size.


Venice Beach sand from low tide, collected in 2003, used in 03F-7
Venice Breakwater, south side
Background grid is 1mm on center, image 15mm wide
Click the image to view it full size.


You have to look closely to see the difference between the Ocean Park and Venice high-tide samples. Things to look for: greater range of sand grain sizes, and larger average. Hard to see by naked eye, but the difference is palpable when rubbed between fingers.

The fine sample is obviously different. I just missed its presence because I didn't pay much attention to the tide, starting sculptures when I could rather than when the tide was good. That changed in late 1995, and led to the 1996 Small Sculpture Revolution.

When the sand grain size is cut in half, 8 times as many of them will fit into a given volume. The aggregated grains have twice as much total surface area for water to hold onto. Small sculptures use much less and, saving energy for carving.

Not many beaches have sand so fine as that in Venice, and even there it comes and goes. A storm changes the beach. Ocean Park sand is just fine enough that it worked for my early sculptures. History in the hand, there, a fortunate alignment of interest and location.

Friday, October 20, 2017

17P-5 (October 20)

More Distractions of Sand and Surf

I had just enough energy after staggering home from 17P-4 to copy the photographs from the camera's card to the computer. Oh... look at that. The new lens has lovely color rendition and great sharpness.

Sand photographs taken the next day show that it is distinctly better than the old lens. Venice fine sand actually has shape and texture now.

By Wednesday I'm ready to try another sculpture. This time I'll take the cart and some tools. Mussel shells are beautiful and carve better than a plain finger, but purpose-made tools are better yet.

It's a reprise of the Friday attempt, even if the surf isn't quite that big. Coarse sand dragged down, big waves pushing high. I pretty much bag the sculpture idea and simply sit behind the Breakwater and watch the play of color and sunlight backlighting the confusion of waves breaking against and reflecting from the rocks. Shades of turquoise and aqua I've never seen rise in split-second curves and splatters. They'd make great photographs, if I wanted to make the effort and distract myself with machinery.

Instead I just watch for a while, and then walk home.

Two days later I head for the beach again. Waves seem reasonable and the air is cool, but there's a strong wind playing among the buildings. I don't see any blowing sand over the beach so I continue the walk.

I'm early. Again, I sit behind the Breakwater and watch the waves. Sparkling under the sun, blown by the west wind that lifts whitecaps and splatters me with salt.

After a time water no longer crosses the storm drain. I head back to the build site and start piling after one wave pushes up just to remind me that the ocean is doing me a favor here. No more waves come close..
   
Build number: 17P-5 (monolith with earthworks)
Title: none
Date: October 20
Location: Venice Breakwater, south side littoral
Start: 12:00, construction time approx. 3.25 hours
Size: about 24 inches tall, 30 inches wide, 18 inches deep (less earthworks)
Digital Images: EOS 5D Mk IV, 100mm L macro, tripod; 50mm macro handheld
New Tools: none
New Equipment: none

I made the base very big because the beach is still wet. It tapers rapidly and then the real piling begins. Free-piling has some natural limits based on the sand; this sand, with its high proportion of coarse material, drains faster. That means I have less time to add each new layer. Pack fast, pack smaller.

Still, there's enough for this short day. The shape suggests some carved forms. I modify them away from the easy defaults. Think and feel. How can this part fit with that part?

With real tools it's really easy to get out of control. The sun moves slowly. There is time to think and feel before cutting, and cut lightly so as to leave room for details and subtle shapes.

The lower third remains very wet. I'd like to hollow it out but there's no real need and the sand isn't all that stable.

I dig some hollows into the beach and add that to the waste sand earthworks. Some curves continue, some stop abruptly. Contrasts and shadows and edges.

It could use more work, and there's time, but I miscalculated the water balance and really need to go. Hunger is assuaged with a chia bar but only a pit stop will solve the water problem, so I do the photography and bail. Too bad... the shadows and light were becoming interesting.

No balls this time. The sculpture is strong enough, and well enough shaped, to stand alone in its shaped environment.


The main photographic record is shot with the 100mm L lens, camera on the tripod. Then I do a round with the 50mm macro handheld from a higher angle as this shows some details better than the low-angle shots. Unfortunately, I forgot to set the lens to auto-focus and can't see anything in the viewfinder due to salt on my glasses. All of the 50mm photos are blurry.

Santa Monica
2017 October 21

October 2-9 tide window:
October 2: 17P-2 on photo walk and sampling. No tools.
October 4: 17P-3 planned sculpture walk with cart, camera, tools
October 6: Started a planned free-pile multiple, but washed out by huge surf

October 15-22 tide window:
October 16: 17P-4, photo walk for sampling, sculpt with shells
October 18: Plan sculpture, walk to beach with kit but big, strong surf cancels start
October 20: 17P-5, planned, delayed by strong surf

Monday, October 16, 2017

17P-4 (October 16)

Distractions of Sand and Surf

The tide window was still open on the Friday following 17P-4, so I anticipated making a multiple with earthworks, and loaded appropriate equipment into the cart. As soon as I came within sight of the beach I knew that plan was threatened: I could see the spray from breaking waves above the high-tide cusp. That should have been hidden at this point in the tide.

The day was hot. Little wind, many people. I continued to the Breakwater anyway, hoping. Hope was dashed by the combination of waves being driven far up the beach by the huge surf that hammered the Breakwater and pushed spray high into the sky, and the coarse sand dragged down by the retreating water. Under the coarse sand was fine, so I started a pile but abandoned the effort when a big wave filled the borrow pit. And that was it for the tide window. What to call this effort? Maybe 17A-1 for "attempt," or 17PA1 for "free-pile attempt." It doesn't happen often.

I spent the next week photographing sand and pebbles. These are lovely when seen up close in detail. I began to suspect I could do better than the old 100mm macro lens I'd bought in 2005; it did well for sand of about 250 microns and up, but the very fine Venice sand always came out blurry no matter how careful I was. I decided to take a chance and buy the more expensive L version of the 100mm macro.

I got home from that errand in time to go to the beach for low-tide still life photography. I unpacked the new lens, put it into the kit bag and walked to the Breakwater.

There were some nice still life subjects revealed by the low tide and relaxed surf.


Also revealed was good sand.
   
Build number: 17P-4 (monolith with earthworks and balls)
Title: none
Date: October 16
Location: Venice Breakwater, south side littoral
Start: 12:00, construction time approx. 3 hours
Size: about 22 inches tall, 24 inches wide, 18 inches deep (less earthworks)
Digital Images: EOS 5D Mk IV, 100mm L macro, tripod; 50mm macro handheld
New Tools: none
New Equipment: Canon EF 100mm F/2.8L macro lens

I had only photographic tools with me. Some scavenging produced a big clam shell and some mussels for carving. Those and fingers would do.

The sand was in layers fine and coarse, which mixed as I packed. Quite strong. Not much on my mind as I did this but the simple fact of being there and carving, shaping with fingers, trying to figure out how to get a hand with a mussel edge into a small space and do some carving without pushing it apart.

Earthworks make for more interesting photographs, at this time of year when long shadows show the relief. I retained the waste sand in heaps for the later earthworks.

And, when done, the borrow pit was still wet enough to get sopping sand. I picked up a double handful and made a ball. A big ball. Another one almost as big went on top of that, and a third for balance off at the far end of the earthworks. The big stack was nearly too big, at about half the height of the sculpture itself.


Santa Monica
2017 October 21